Different regions were known for wanting different characteristics in shoes. For example in the United States the Northerner liked shoes that were comfortable, neat but also stylish. The southerner was known to desire a pair that were fancy and handsome. Then the westerners would demand a shoe that had solidity and fullness to deal with the rough terrain. There were many resources were put into the shoes of Victorian times. There were the herds roaming on the Western plains or in their backyard that provided leather. The hemlock and oak that help to tan the leather. Then too many textile manufacturers supplied cloth and thread while mines, furnaces and forges helped make the nails and wires that went into putting the shoe together. In this article we will take the shoe through a step by step process that would have been found in a mid 1880s factory.
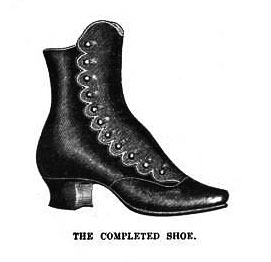
The Ladies’ Button Shoe
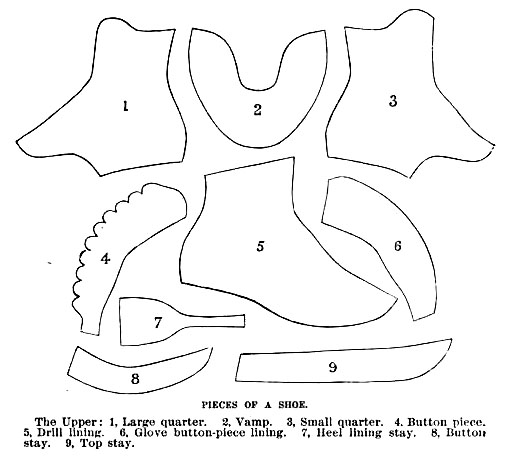
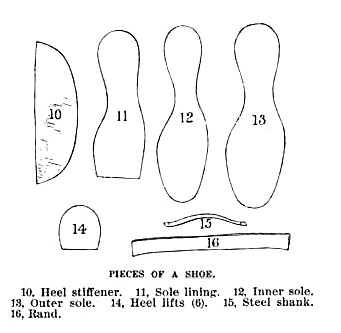
Just to tan and prepare the leather was a very involved process itself. But once finished the leather was used for the essentials of a shoe which are the upper, the sole, the counter or heel stiffening, and the heel. But there are many pieces that these can encompass. So as many as over forty pieces can come together to make a pair of Victorian shoes.
In the making of the common ladies “button shoe”, the glossy kid skin is put on a cutting board. Particular care was taken to not cut on “the way of the stretch” and the vamp, large quarter and small quarter pieces have specific uses from which the skin was used. For this particular shoe two pieces of lining were cut: the drilling, a top stay, button stay, heel stay and button-piece lining all from sheep skin, so that it requires twenty pieces just for the upper part of the shoe!
Stitching the Shoe Pieces
In the day before machinery it would have been hand-stitched but in the 1880s there was the aid of sewing machines that could do 600 stitches in the minute. In this same time period girls, no matter their age, were usually the ones who ran the sewing machines. So in these “stichting-rooms” the work of putting the pieces together took place. Here is a description of this process…”the small quarter and button piece are ‘closed’ on the large quarter, the seams are ‘rubbed down’ on the inside, and a ‘stay’ is sewed over the inside of the seam with a row of stitching on each side. The different parts of the lining are stitched together in similar manner, when outside and lining are passed along to be ‘closed on.’ A small cut on the front of the lining is the only guide by which an experienced ‘closer-on’ knows where to begin her work, yet as with accurate eye and practiced hand the needle and ‘trimming’ knife’ follow the winding outline, it seems as if she must be following a traced pattern. Lining and outside are stitched together on the wrong side, and to get them right side out, a ‘corder’ forms the top and button scallops over a round-pointed piece of steel securely fastened to a table. The seam thus left on the inside forms a cord or “bead” on the whole outline of the boot, which is held in place by ‘stitching round’ one row of stitching to follow the outline. One machine cuts and works a button-hole in each button scallop doing the work so regularly that an exacting seamstress would not hesitate to commend it. After the ‘vamp’ has been joined to the quarters by two or three rows of stitching, there is no use to look for more pieces, because they have all been sewed together. They have become an ‘upper.’ ”
The Sole of the Shoe
Now came time to prepare the sole for the last and this was called “stock-fitting”. The leather that was to become the bottom or sole of the shoe was dampened so it could be cut, die, split and moulded more easily. Once this was accomplished it was called “stock” and was then subjected to pressure by going between two rapidly revolving rollers. Next it was rolled through a splitting machine to make the leather an even thickness. Lastly, it was cut with a machine that had the appropriate dies of each shape, size and width. Before the invent of the die-machine this part of shoemaking was done by “rounding out” which was hand following the shape of a tin pattern to cut the sole out.
Now it was time to connect the sole to the upper and this stitching was done by a machine called a “channeling machine”. This ran the stitching into a groove of the shoe. The “feather-edging machine” took a small shaving off from the flesh side to make the edge lighter than the rest of the sole. To help shape the sole it set between two heavy iron “moulds” which subjected them to the pressure of one or two tons.
Finding Your Shoe Size
A part of the shoe called the “last” played an important role in making perfect shoes. Patterns and lasts were graded for different sizes and widths of feet. These changed frequently with the fashions. A prospering factory for example would carry a variety of fifty different kinds of lasts and patterns, each style having around nine sizes or eighteen if they were using left and rights. At one time shoes could “paddle their own canoe” which means they could fit on either foot. But by the 1880’s it was becoming quite commonplace for shoes to have a right and left. However, at this time there were still many factories that were making the shoe that could fit on both feet.
So what was the standard sizes of shoe in the 1880’s? Well the size stick was used to determine the sizes of shoe a person would need. The size stick is explained here in detail as well as the industry standard shoe sizes, “The first part of the size-stick is quite plain, because the smallest size of boots or shoes made is five inches long, and to get this length, the sliding upright has to be pushed forward to the first line of the size-stick. This is called the first size; but babies’ shoes mostly run from 2 to 5 sizes. It must be understood (see lines) that every third part of an inch is one size, and the sixth part of an inch is half a size; the next set of sizes are termed sixes to nines, and the next tens to thirteens; these are called children’s. After the thirteenth size, the next third part of an inch is marked No. 1, No. 2, No. 3, and so on again. The first four sizes are termed ones to fours, and form the set of sizes to which youths’ or misses’ boots or shoes are cut. The first seven sizes, in this second numbering of the size-stick, are termed women’s sizes, and, from the fifth size to the fourteenth are called men’s sizes; so that babies’ shoes run from five inches to six inches and two-eighths; children’s six to nines, from six inches five-eighths, to seven inches five-eighths ; girls’ tens to thirteens, from eight inches to nine inches; youths’ ones to fours, from nine inches and three-eighths, to ten inches two-eighths and a half; women’s ones to sevens, from nine inches and three-eighths, to eleven inches and two-eighths, and men’s fives to fourteens run from ten inches and five-eighths, to thirteen inches and six- eighths. These six different sets of sizes are known in the trade by figures, as follows : 2 to 5, 6 to 9, 10 to 13,1 to 4, 1 to 7, 5 to 12.
The Laster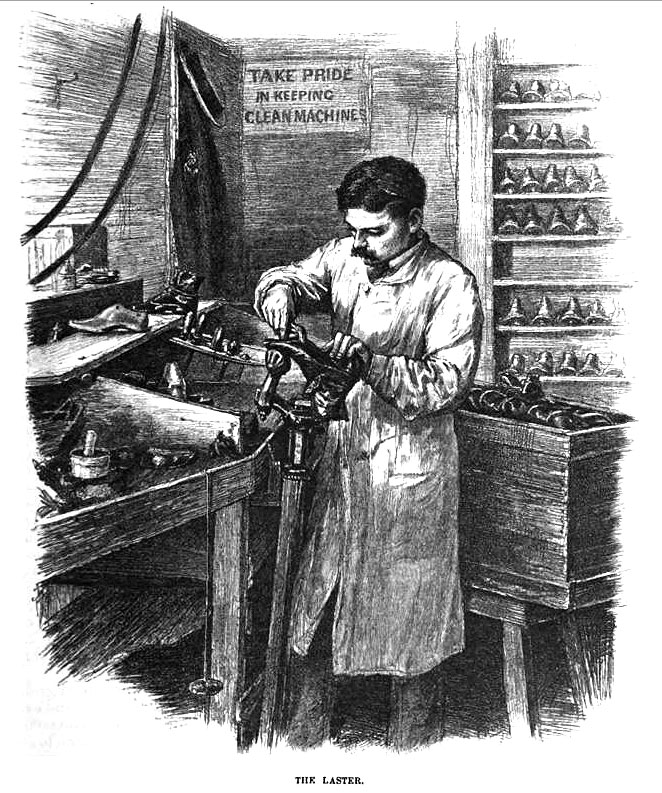
During this time no machine could do the work of “lasting” the shoes like a pair of human hands. So here the laster had his kit complied of post, jack, hammer, pincers and awl, being tools of the trade. I know many of my ancestors hailing from Plymouth county, Massachusetts who worked in the numerous shoe factories were familiar with these tools. On the census records many of my ancestors were listed as Lasters, and so now I have come to know and understand what their role was in the factory they were employed at.
The description of their occupation being this, “The laster with his pincers pulls the upper tightly over an iron-bottomed wooden last, the inner sole is adjusted, a dampened piece of leather, half spherical in shape, called a counter, or stiffening, is inserted at the heel between the outside and lining, and sharp-pointed little tacks, clinched by the iron bottom of the last, are driven at intervals to hold the upper in place. The laster supplies the tacks from his mouthful of them, and his pincers have a hammer head which drives them in. His flattened thumb is also an important tool to him, and is his distinguishing mark among his fellow craftsman. A ‘steel shank’ is also inserted to assist in keeping the shank of the shoe in desired shape. The outer sole is applied by a ‘nail tacker,’ and this workman, by the assistance of his machine can ‘lay the soles’ for a dozen lasters. Lasters apply the sole to the upper, but do not unite them.”
Coming Together
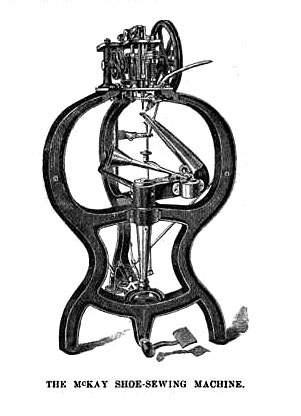
Now the shoe moves on so that its sole may be stitched and then permanently attached to the upper. At one time when these were stitches by hand it would take a workman who was efficient fifteen minutes to accomplish this task. By the 1880’s machines could do the same task in a fraction of the time. One machine that revolutionized the process of sewing the sole to the upper was the McKay machine. Manufacturers of the time would pay royalties to use the machine. The shoes put together with this machine would have a stamp attached to them, like a postage stamp, with the “McKay” name on it.
Finishing the Sole
Now remember that groove made by the channeling-machine? When the shoe was put together that groove would have been filled with naphtha cement and then the sole of the shoe subjected to more pressure. Machines would trim up the edges of the shoes to remove the unnecessary parts. To go up against the high finish on the upper leather they would apply blacking to the original leather color of the edge. When it would come in contact with the moving “edge-iron” it would be “set” or “burnished”. Then the sole was held against a cylinder covered in sand-paper and “buffed” the grain of the leather leaving it “white and velvety”.
What a Heel
Whether it was French, medium or “common-sense” the heel of the shoe made an impact on its beauty. To construct the heel a number of “lifts” were cut from a piece of leather and then tacked onto a pile and punctured with small holes to be filled with nails. A wedge shaped “rand” was put under the heel lifts to make the heel level and the crude heel was pressed upon the “heel seat” of the shoe by a machine that nailed it. A quartz covered wheel then “scoured” off the roughness. Blacking was then applied and polished by a heated iron of a burnishing machine. The heel top is also buffed. At this point the pair of shoes are tied together and sent for their final steps in the factory.
To finalize the shoe a kid lining was pasted over the inner sole. This would have been trade-marked by a monogram machine. Then the shoes were buttoned up by “trimmers” and carefully laid away in a pasteboard carton by a “packer” and then sent to the merchant. Thus concludes our walk through the making of the Victorian shoe in a factory of the 1880’s. If you would like to do further reading on exactly how to make and repair Victorian shoes, you can read this book The Art of Boot and Shoe Making.
A Timeline
Through machine and human hand it was estimated that the time it took to produce this pair of shoes was about two hours time. For those who may find it interesting here is a timeline of machines that helped revolutionize the process of shoe making during the mid 19th century up to 1884.
Unknown Date – Rolling-machine, hand power; steam power applied in 1851.
1840 – Sole-leather “separating machine”.
1844 – Sole-leather “stripping” machine succeeded by “splitting” machine.
1844 – Sole-cutting machine, foot-power;steam applied in 1857.
1845-7 – Dies used for hammering out.
1851 – Howe sewing-machine used for stitching by a Worcester (Massachusetts) manufacturer.
1851 – Die-machine, foot-power; steam-power and revolving die-block applied in 1857.
1855 – Buffing or sand papering machine.
1857 – Pegging-machine.
1859 – Splitting-machine.
1862 – McKay sole-sewing machine.
1864 – Self-feeding eyeleting machine, foot-power.
1866 – Sole-moulding machine.
1867 – Heating-out machine.
1870-1 – Hotkit heel-burnishing machine.
1871 – Edge-trimming machine.
1872 – Cable-nailing machine; succeeded by standard screw machine in 1876.
1874 – Edge-setting machine.
1880 – Sole-rounding machine.
1882 – Lasting-machine on men’s work.
1882 – Button-fastening machine.
1884 – Patents taken out for lasting-machines, yet untried.