While away the dreary January days making tissue paper flowers as the Victorians did! Enjoy this article from the New England Farmer from 1887.
The art of making flowers from tissue paper has become rapidly popular of late. Almost everywhere ladies have seen specimens which have excited their admiration and aroused their curiosity. It is the object of the writer to furnish such information as will be of practical assistance in that direction. The whole subject is simply and easily understood, and some ladies succeed very well without special instruction, puzzling out the matter by pulling apart specimens which they have bought ready made. This, however, except in those who are gifted with more than average ingenuity, requires considerable time and trouble, which the directions here given will save.
One of the first requisites for learning anything of this kind is to make sure you understand the terms used, and we will commence by explaining what is meant by folding, goffering, crimping, curling, tinting, staining, slips, slipping, up, etc.
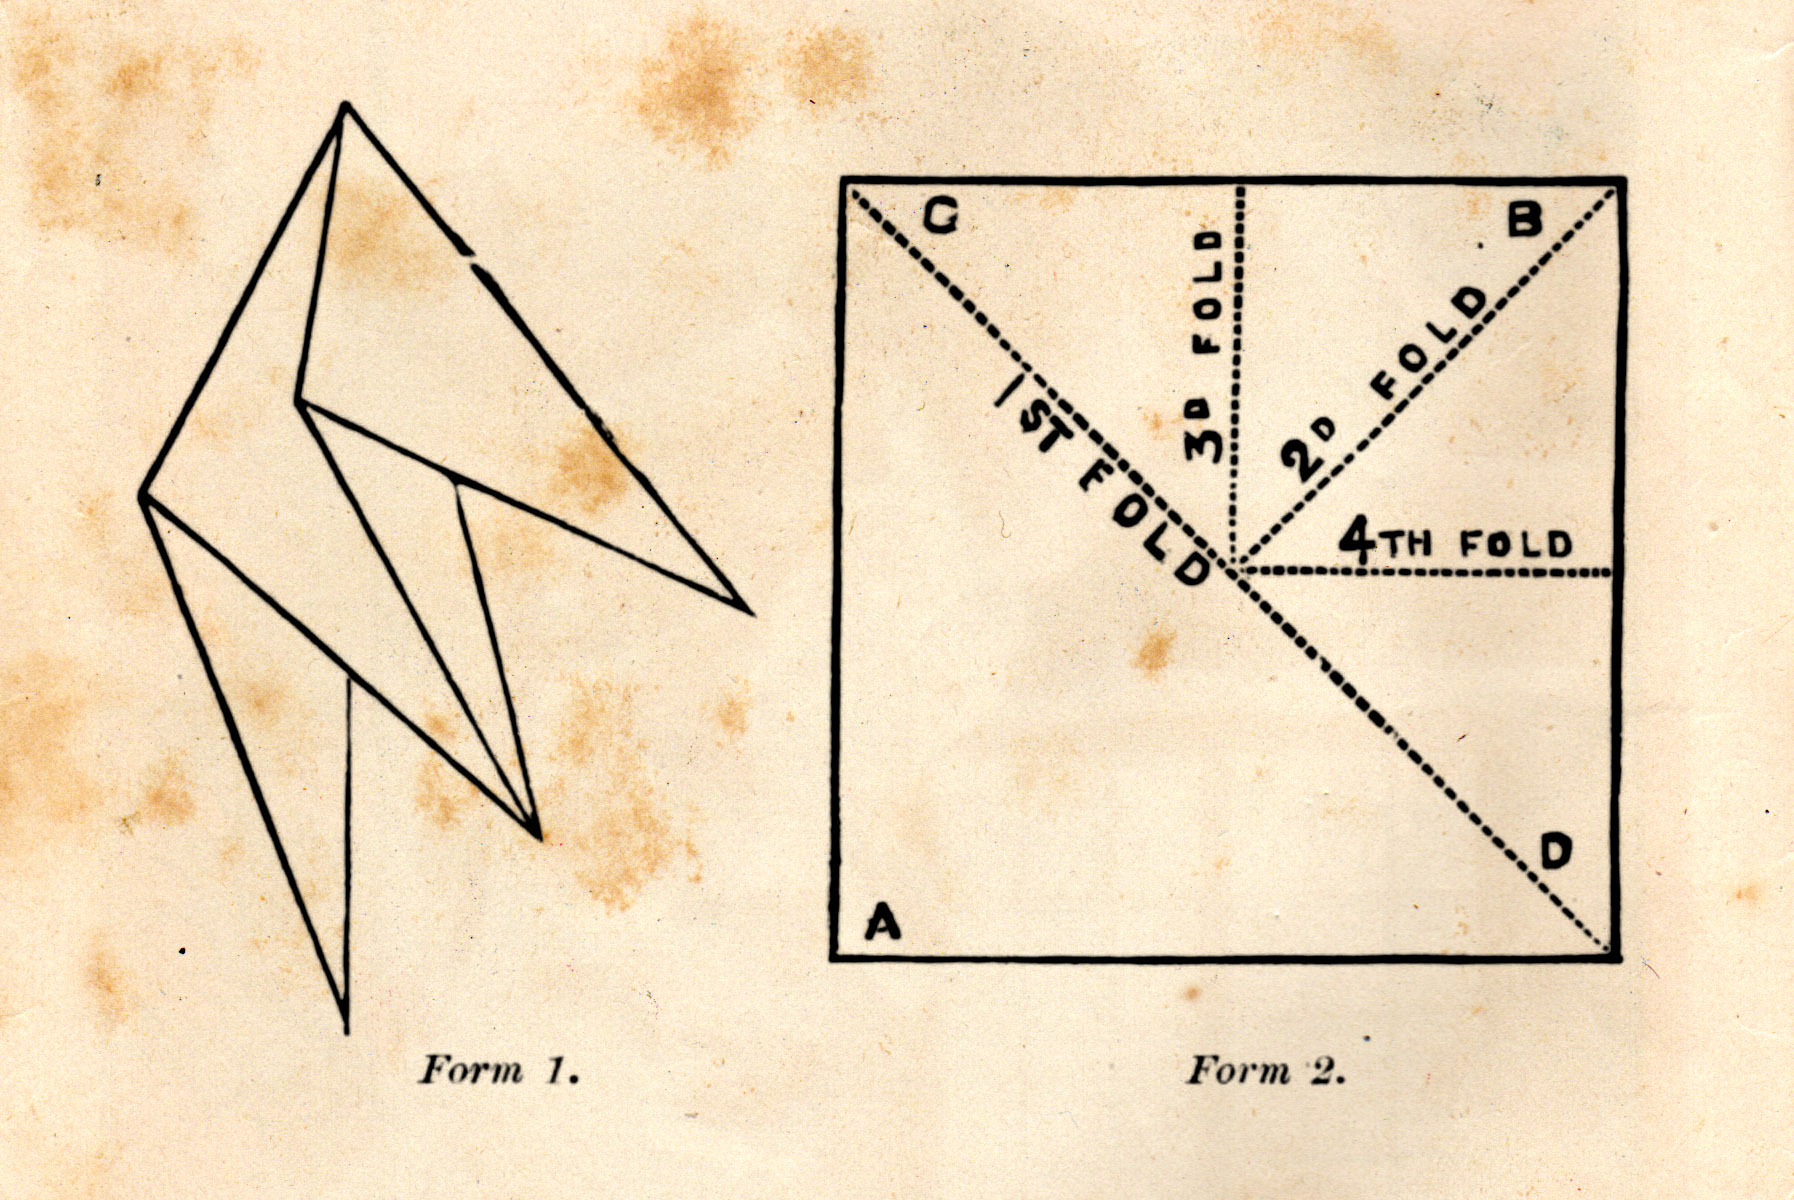
Folding. The petals whether to be used separately, or as slips, are cut by folding the paper until a number of thicknesses can be cut at once. Most forms are cut from paper folded so as to make eight thicknesses. This can be done by doubling it, making two, doubling that, making four, and doubling that in the same way, making eight; but this is not the best way, as that makes the crease of the last fold 4 thicknesses. The right way is to take a square piece the proper size for the intended form and fold one corner A over on the corner B obliquely opposite, (see Form 1). Crease the fold sharply down and fold again, bringing corner C over to corner D. Crease the fold formed by this, and fold the corner C back to A. Turn the papers over and fold corner D back to B. This forms a back and forth sort of folding as in a fan, and the paper if allowed to spring apart a little appears as in form 2, and when pressed flat forms a triangle 1-8 the size of the sheet when opened out.
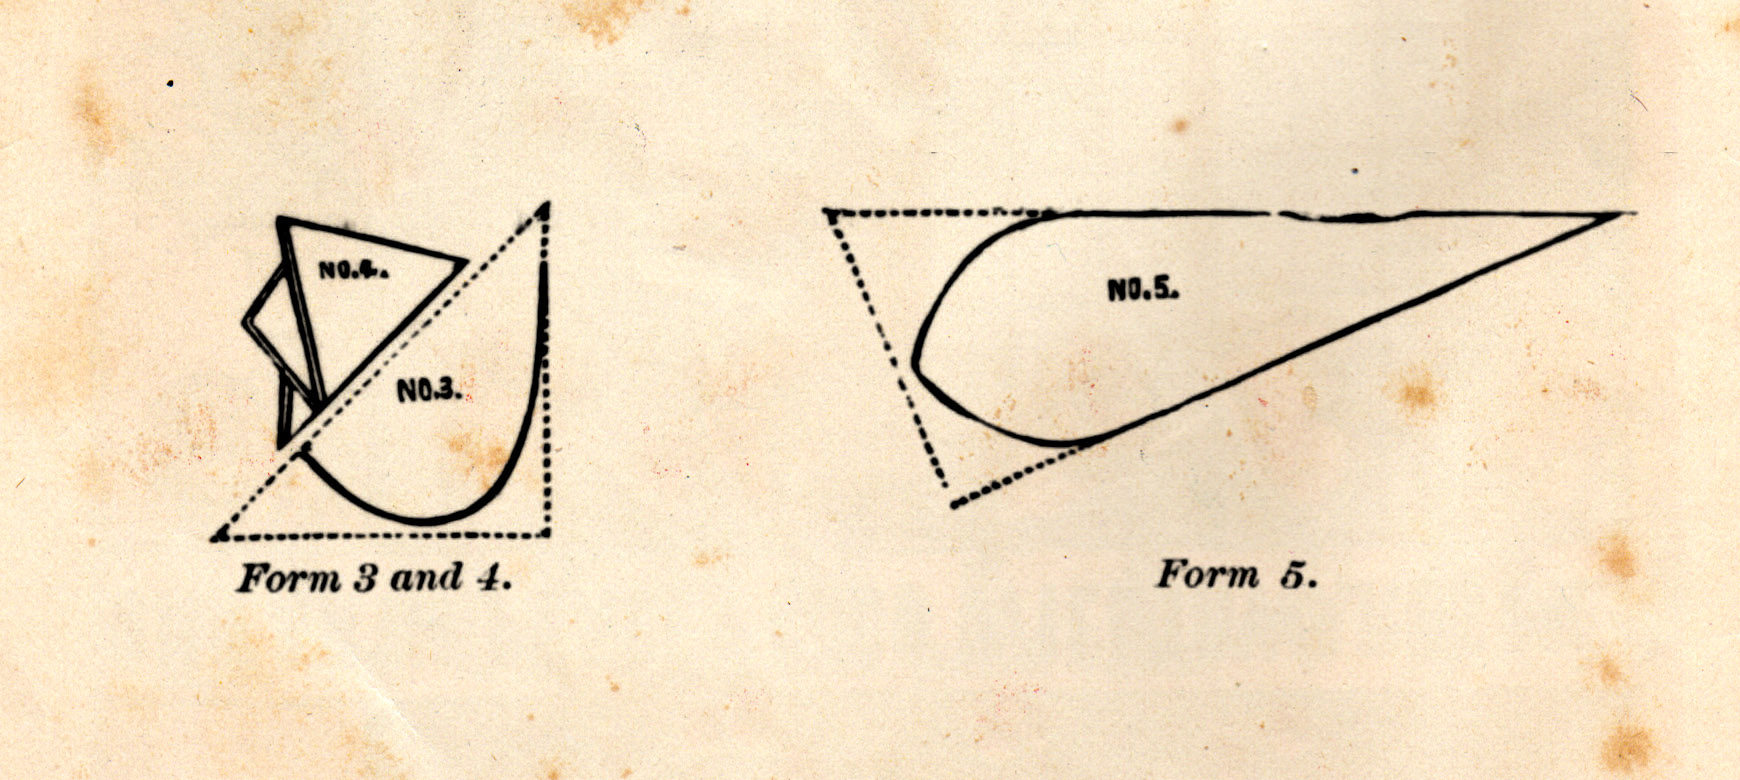
Form 3 shows this with a line indicating where it should be cut to form a slip for a flower having four petals, as for instance the Poppy. In folding be careful to have the folded edges come even one with another—with the cut edges it is not important. In all the forms for cutting in the following, the dotted lines show the shape and size of the folded paper, and the solid lines indicate where to cut it. You can probably in most of the forms cut them accurately enough without further guide than looking at the diagram, but if not expert enough for this open out the paper and lay it over the diagram so that the crease comes on the dotted lines, and then trace the solid line on the paper and fold and cut by the line.
In some cases the paper is folded six thicknesses instead of eight, which produces the form shown in Form 4.
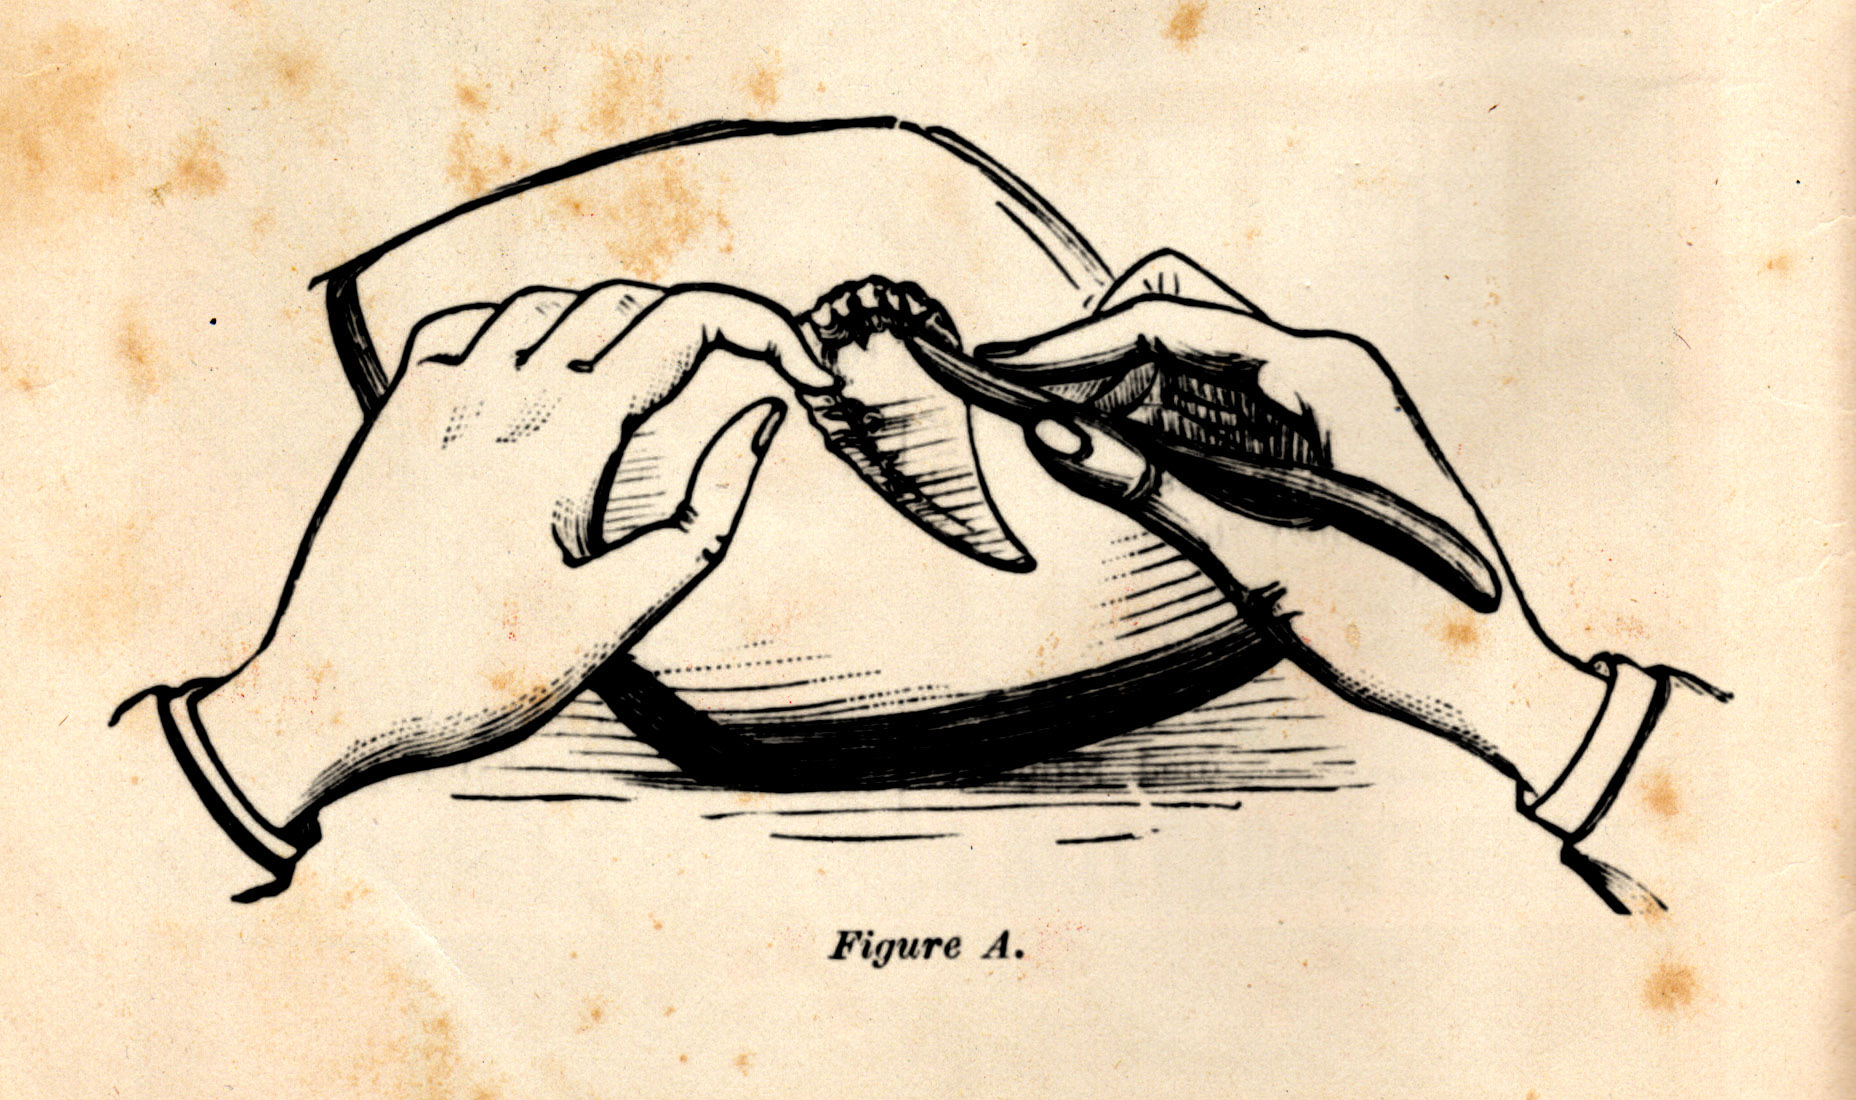
Goffering is done with a smooth stick called a goffering tool. This may be easily whittled out at home. For the shape and size, see Fig. A.
Figure A shows how it is used in goffering the inner petals of the large, full blown rose. A cutting of eight of the petals is laid on the cushion of cotton as shown in Figure A, and the goffering stick pressed firmly down at a slight distance from the edge and drawn down toward the pointed edge of the petal, which causes the edges which project beyond the stick to curl up and crinkle.
The same process is repeated for the other edge of the petal. Then turn the petals over, and using the sharp edge of the tool, make a sharp crease down the centre of the petals, which causes a different crinkle.
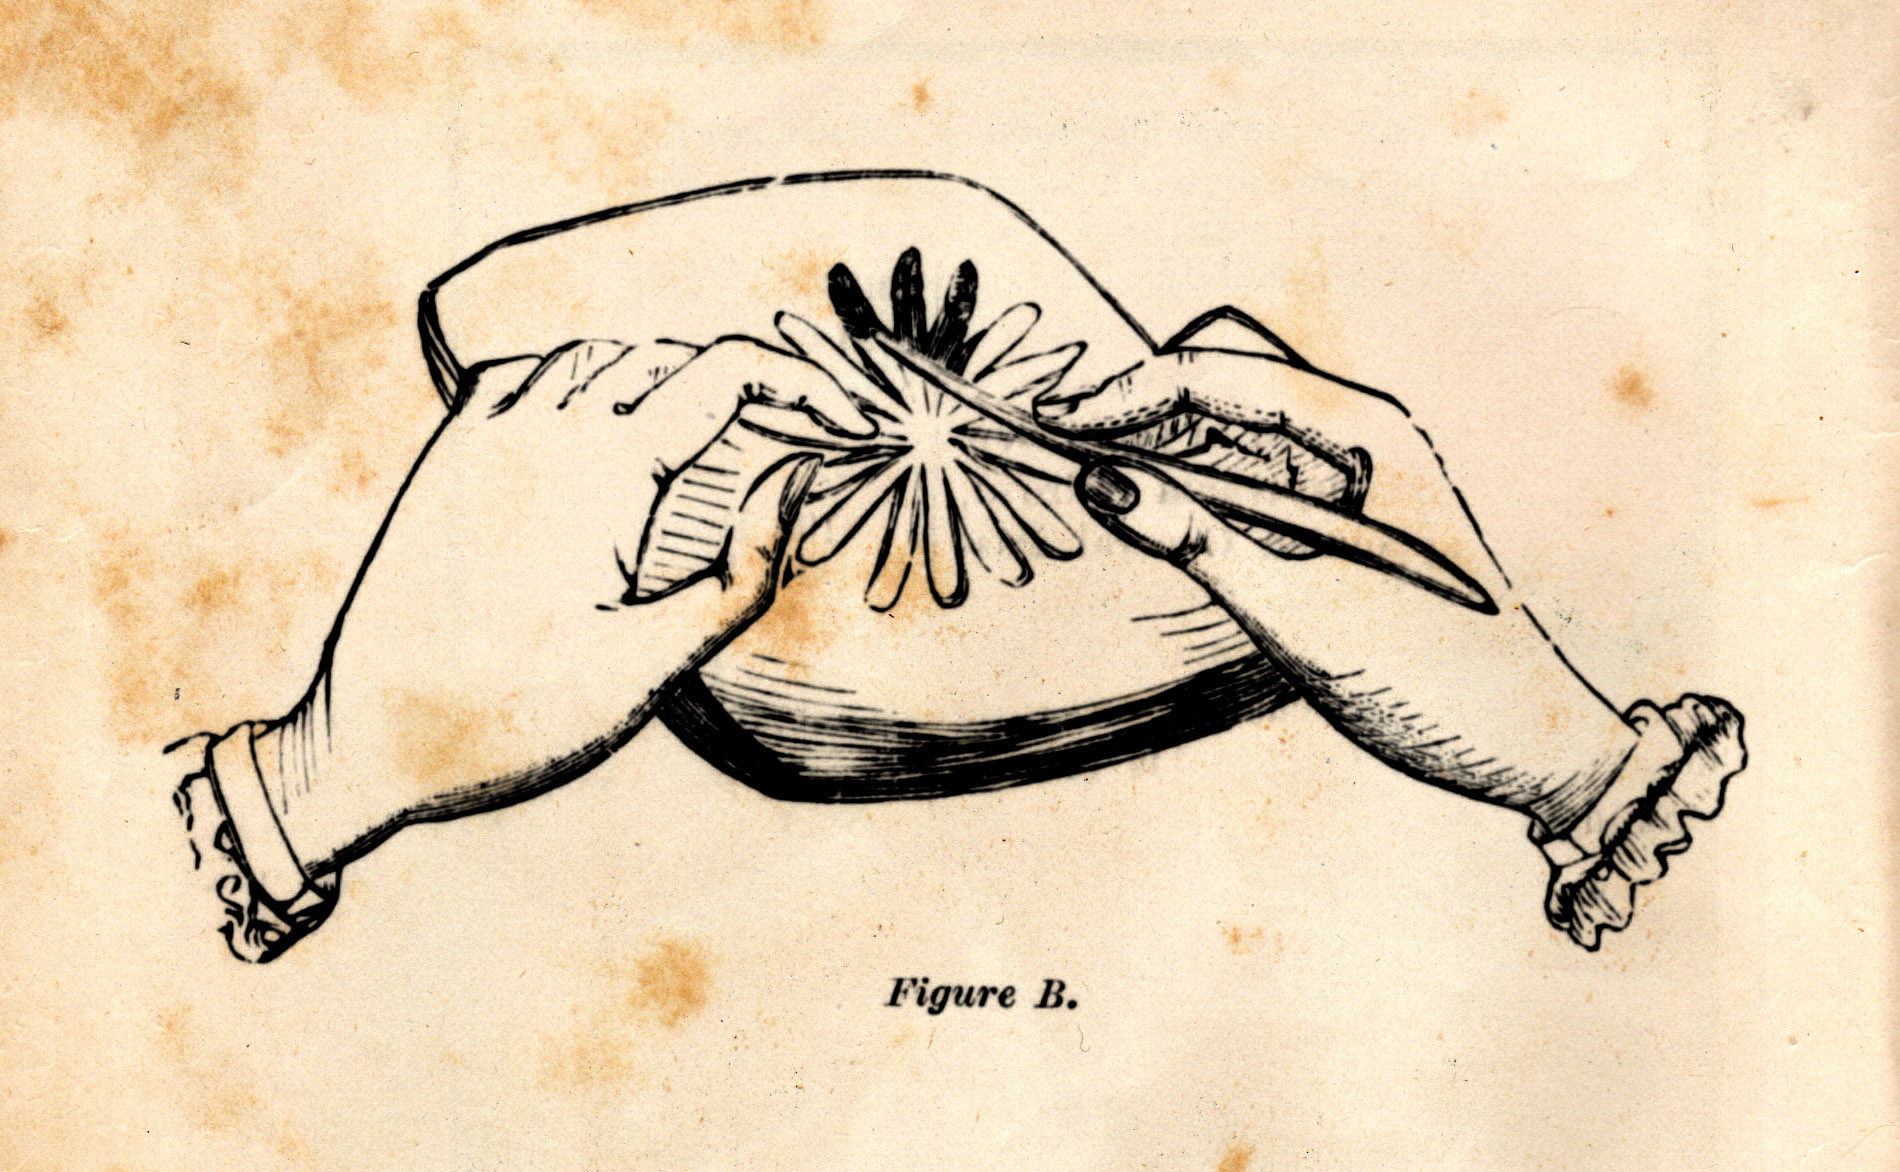
Figure B shows how goffering is done in the case of the Aster. The form having been cut, several thicknesses, it is laid on the cushion, and the sharp edge of the goffering stick drawn sharply through the centre of each petal.
Tinting.—The point of the petals toward the centre of the flower are usually of a different tint from the outer end, and to produce this effect the paper must be tinted. The best and simplest method of doing this is to cut the squares of paper and before folding them to cut, lay them on the table, and with a small ball or wad of cotton dipped in dry powdered color, rub round and round in the centre of the Squares. A very little of the powder is sufficient, and the tints so obtained are very delicate and blend perfectly into the color of the paper.
For darkening the centre of the poppy, use a powder of vandyke brown with a little ivory black ; for the outside petal of the pink tea rose, use chrome yellow with a little French chalk and the same for the inner petals of the full blown double rose. For the centre of the snowball, use chrome green and French chalk. For the yellow rose, use chrome yellow with a little carmine. A few trials will teach you how to obtain any desired tint.
In some cases, as the outer edges of the inner petals of the full double pink rose, it is necessary to supplement the tinting with staining which is done wet. Take the petals just as cut and dip them in water, and while still wet dip the edges into another little saucer containing water in which a little carmine has been dissolved. The carmine will run in a little from the edges here and there, giving the irregular and delicately blended shading of pink and white seen in the natural flower. While wet the petals will look rather limp and discouraged, but they will dry out all right. Of course they must be thoroughly dry before you attempt to goffer them.
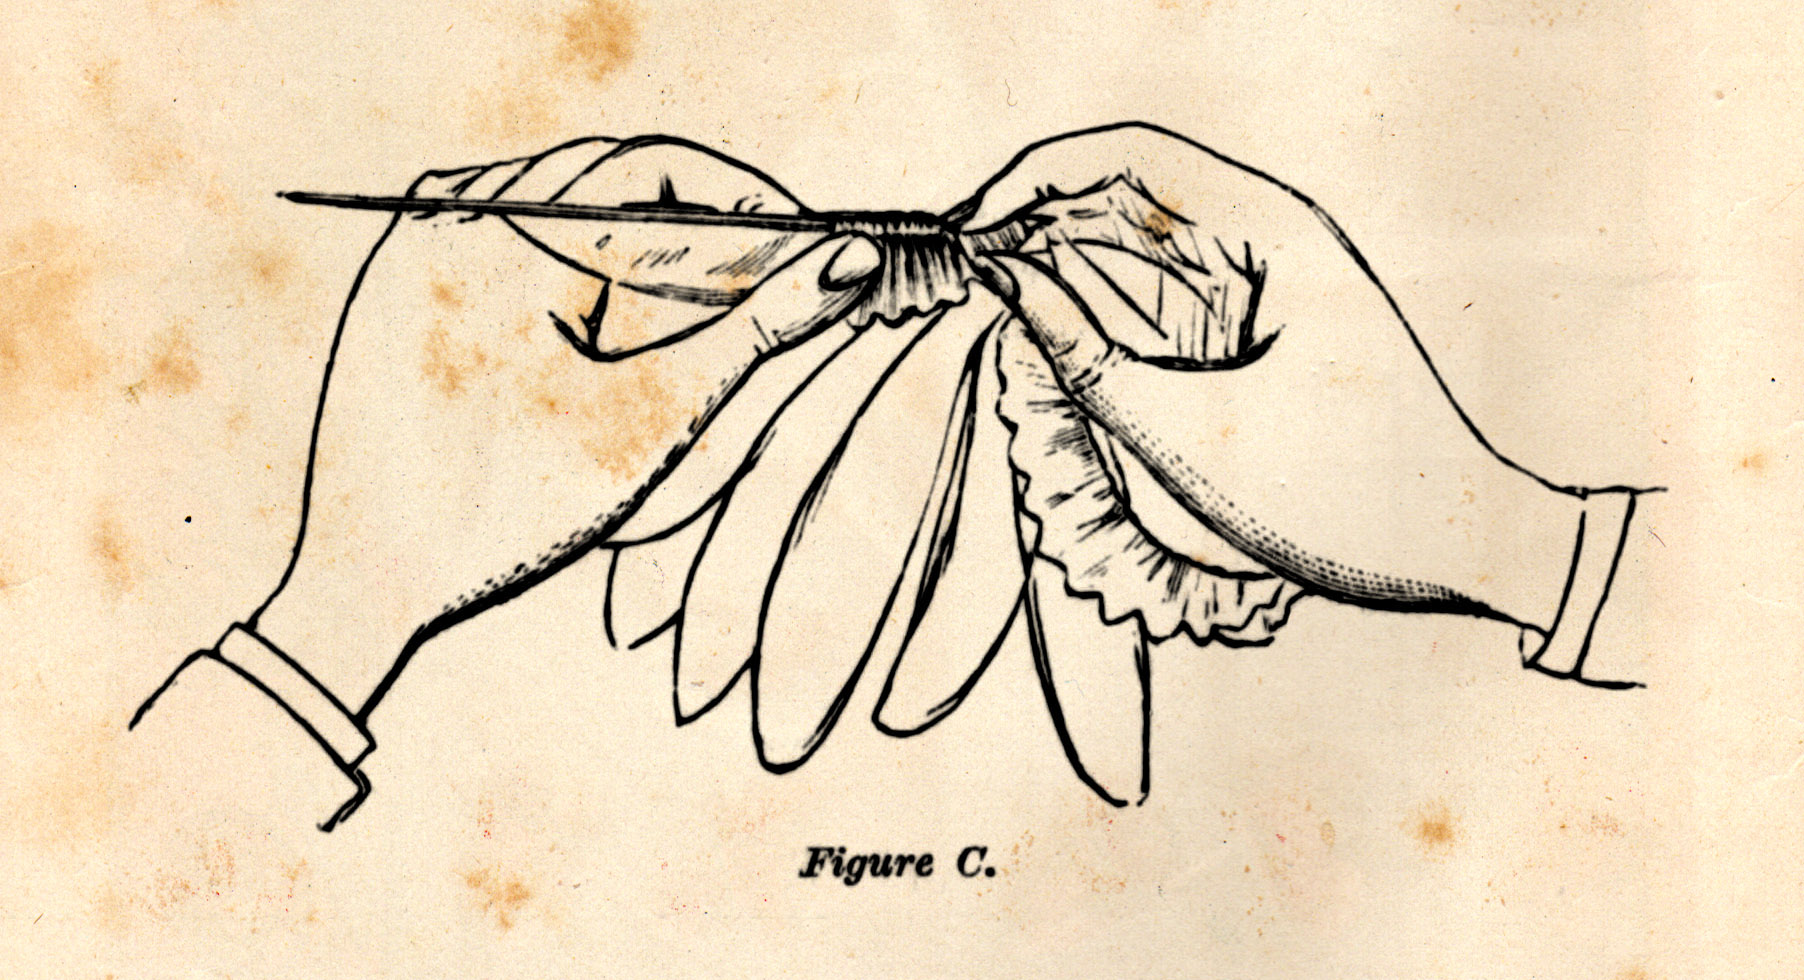
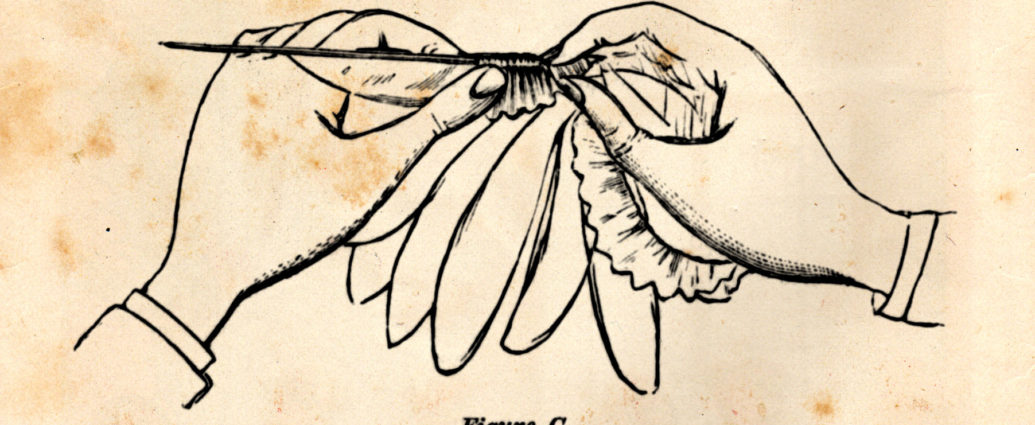
Crimping is done in different ways for different purposes. For the large rosette Fig. B, the method is shown in Fig. C, and is very simple and quick when once you see it done, though many would puzzle along time before they discovered just how to do it. Take a knitting needle or similar bit of wire, and thrusting one end of it through the centre of the piece of paper cut after form 1, let the other end project in a line with and beyond the point of one of the petals. Fold the petal over the wire (the paper may be folded first), and holding it as shown, with the forefinger of one hand on top, take hold of the folded paper with the thumb and finger of the other hand and press the paper toward the hand which holds the wire, at the same time slightly raising the finger to allow the small plait or wrinkle which will be formed in the paper, to pass under it and be held by it. Draw back the thumb and finger a little, and press another little fold of paper under the finger of the other hand, and so on till the whole petal is pressed tightly together in a series of little crimps. In following up this description this may appear slow, but the motions here described may be repeated very rapidly, after a little practice.
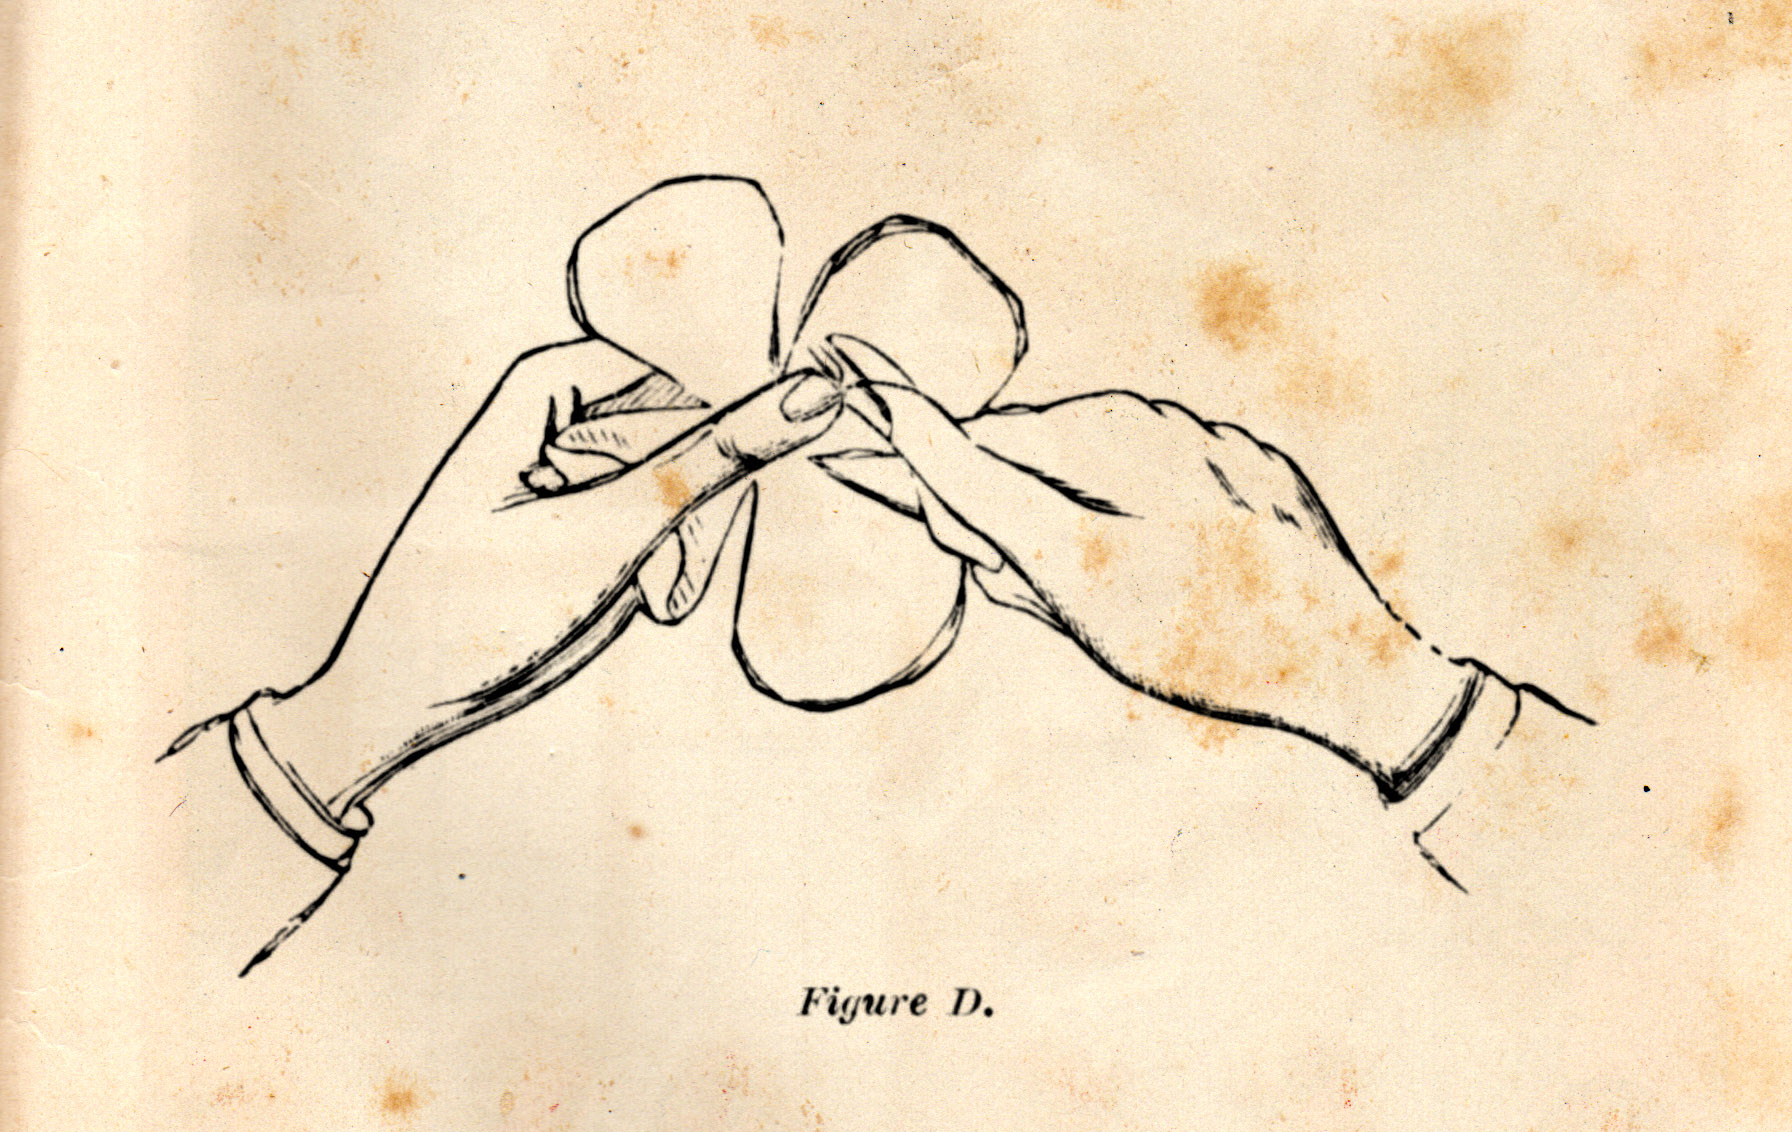
Another method of crimping is used for the petals of the poppy which is shown in figure D. The cut shows pretty clearly how it is done. The paper is held between the thumb and finger as shown, and in the other hand a small knife is held the blade of which is pressed against the paper so as to catch a small plait, which is pressed between the thumb and finger holding the paper. The knife blade is slipped back a little and another plait taken, and so on, working all around but a little in from the outside edge of the petal, which causes each petal to form a deep cut. This is rather difficult to become perfect in, and we would suggest practice in order to work with confidence.
Curling.—In the Rose you will perceive that the edges of the outer petals turn or curl over. Without this curling the flower would be very stiff and unnatural. Curling is done by simply drawing the paper over a sharp edge, as for instance by holding a knife so that the blade presses against your thumb, and then drawing a piece of paper two or three times between the blade and thumb. It will be found to curl over toward the side the knife is on. The blade should not be too sharp, as it is to rub the paper not cut it. The curling is usually done after the flower is made up.
Slips and Slipping.—It is evident that in making a rose, the petals may be cut separately and pasted one by one around the centre, and many make them by that method, but a simpler | way and one that saves much time and labor, is to make slips for all but the outer rows of petals. By a slip is meant a set of the petals, left connected together, as for instance, the four petals of the poppy. The paper folded as shown in figure and cut by the line will when opened out, have the four petals shaped out, but connected in the centre. In making up the | flower, the wire for the stem is thrust through the centre of the slip, and it is ‘‘slipped up’’ the stem, and by a little gum attached to the centre as described further on.
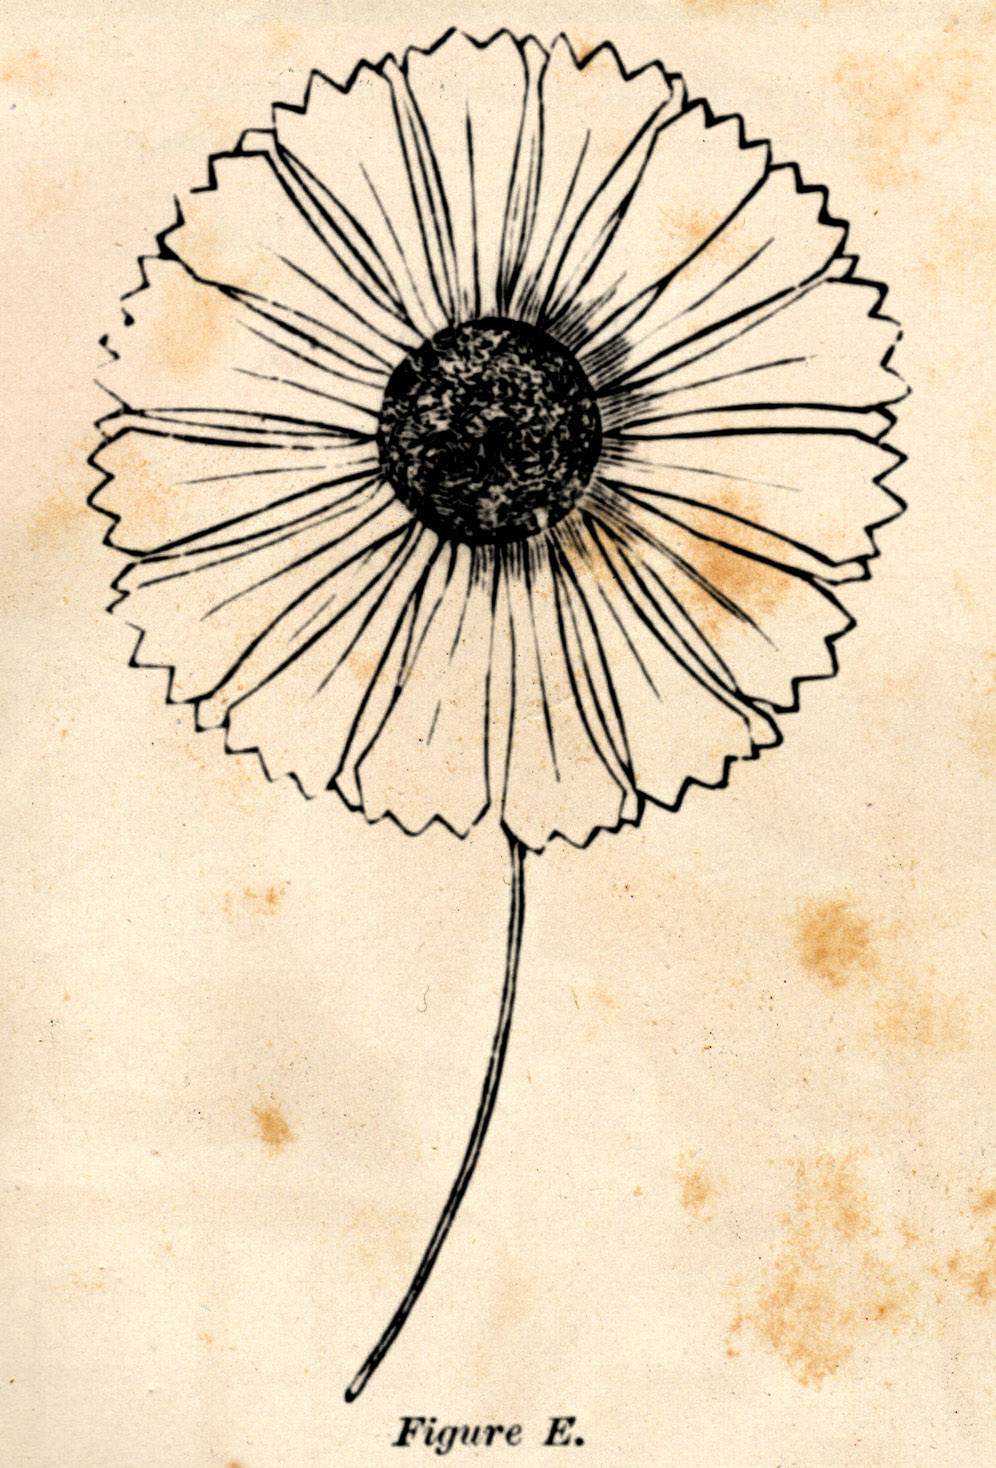
Daisy and Form for Cutting.—Cut two slips as shown in Form 1, crease the petals slightly through the centre, and slip them on so as the petals of second slip alternate with those of the first slip. The centre can be made of silk floss, or wool, purchased ready made; thin wire is used for stems, covered with tissue paper.—Cottage Hearth.
Source New England Farmer January 15, 1887