I found this article entitled the Art of Stay Making while perusing Peterson’s Magazine. This article is dated 1855 and gives instructions on how to make stays for corsets. I thought this could be useful for those making authentic costumes or for doll’s clothing.
In pursuing our intention of giving a series of articles, instructing the readers of “Peterson” how to make their own dresses, we take up, this month, the subject of Stay-making. There is nothing in dress so important as to have stays made properly. Physicians unite to say, that, while such heavy skirts are worn, stays are indispensable to prevent pressure on some of the most delicate organs of the body, which is invariably the result where skirts are tied around the waist, without stays to distribute their weight . A badly fitting stay, however, cramps the figure, and injures the health seriously. A correct stay avoids tight-lacing, and it is how to make one of this kind, that we shall now proceed to describe.
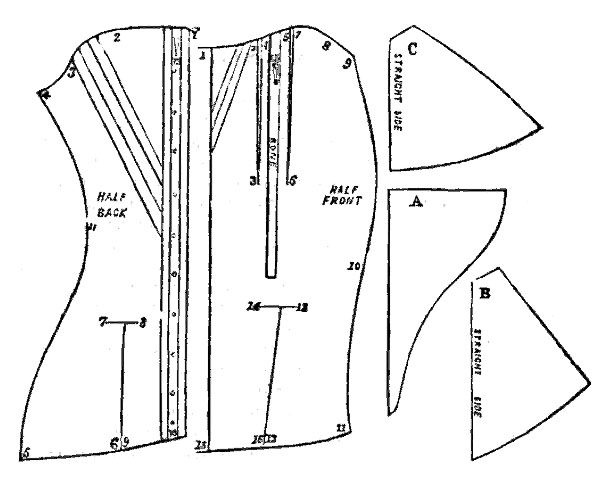
THE MATERIALS.–For the materials take half a yard of Coutille*; a piece of stay-tape, for casing; some whalebone, either ready prepared, or in strips to be split and shaved to size; a steel busk; wash-leather sufficient to cover it, and webbing to case it; a paper of 8-between needles; a reel of 28-cotton; a box of French holes; and a punch for putting them in.
DIRECTIONS FOR TAKING THE MEASURE.–Measure round the waist, noticing the number of inches; deduct two as an allowance for the clothes. Next take the measure of the bust, by placing the measure in the middle of the chest, at figure 1, (see engraving) and pass it over the bosom to figure 8, not tightly, and no allowance here to be made for the clothes.
Then, from figure 8, passing the measure closely under the arm, to figure 1 of the back, which is not to reach the middle of the back by an inch and a half. Next, place the measure at the bottom of the busk, and pass round stomach and hips, allowing about four inches for clothes, and then take the length of the busk.
It must be remembered that stays ought NOT TO MEET when they are laced on. It will be found to simplify the directions very much, if a form, similar to the following, be first prepared, and the number of inches written against each as the part is measured, and then no confusion can possibly take place in the cutting out:
- Waist
- Bust.
- Back.
- Hips.
- Length of Busk.
DIRECTIONS FOR CUTTING OUT — A pattern must now be prepared according to the directions given in the engraving, which can easily be done by enlarging the design, and adding the requisite number of inches between each figure.
THE BACK. Double the Coutille sufficiently wide to take two whalebones, the holes, and to turn-in for felling-down, as marked in the engraving; then lay on the pattern, and cut out the two parts of the back together, allowing for turnings-in, about half an inch at the seam under the arm.
THE FRONT is cut out by placing the pattern so that the straight way comes in the direction of the little bones up the bosom, leaving a good turning-in up the front seam, which creases off in patterns on the double Coutille, as it is better to cut out every part in the double, that you may have each side exactly alike.
Should you desire to increase the size of the stays, it must ALWAYS be done by allowing the required additional size on the front and back at the seam under the arm, and by proportioning the arm-hole to the increased size.
When the bosom-gores are to be put in, the Coutille is merely out from figure 2 to figure 3, and from figure 5 to figure 6, in a direct line, cutting none away. In cutting places for stomach and hip-gores, in front and back, cut straight up and then from figure 7 to figure 8 in back, and from figure 13 to figure 14 in front . Then cut out all the gores as directed in the engraving.
DIRECTIONS FOR MAKING.
1st.–Stitch a place for the first bone at back, and for the holes, the width of half an inch, keeping the line perfectly even by the rays in the Coutille, and fell down a place for the second bone on the wrong side.
2nd.–Fit the bosom-gores by making a narrow turning-in, from figure 2 to 3, and from figure 8 to 4; fix the gore at 3, the straight side of the gore next the busk, tacking it very closely up to figure 2; then fix the other gore in like manner at figure 6, the straight side next the arm-hole, tacking up to figure 7.
3rd.–With a measure, make the required size across the bust, by increasing or diminishing the gores at the top; tack the other sides very firmly from figure 3 to 4, and from figure 6 to 5, shaping them prettily, narrow at the bottom, and of a rounded form toward the top; then stitch them very neatly, and cutting away superfluous stuff on the wrong side, hem down, beginning each side from figure 3 to 6.
4th.–Hem a piece of stay-tape at the back, for little bones, and stitch down the middle of it on the right side.
The other half front to be done in a similar manner.
5th.–Put in the stomach-gores, turning-in from 14 to 15, and tacking the straight aide of the gore under it, and fix the hip-gores in the back in like manner, the straight side to the holes.
6th.–Join the seams under the arm, by pinning figure 10 of half-front to 11 of half-back, to half the size of waist required, wrapping the front on to the back. Everywhere face each piece to its fellow piece, and crease it, that it may be exactly the same size and shape. Then do the other half in the same way.
7th. — Having closed the seam, finish the stomach and hip-gore, by measuring and making to the size required round the hip, by letting out or taking in, rounding them to fit the hip; face and crease the gores for the other half, which is to be finished in the same manner.
8th.–Take a piece of webbing wide enough to case the busk when covered with wash-leather; double it exactly, and tack down the half-front, the double edge being scrupulously down the centre of the stays; fell it on very closely. Then stitch the two halves together at the crease down the middle; turn the other half of the webbing on to the unfinished side, and fell it down as before, turning in a little piece top and bottom, and finish.
9th.–Bind the stays very neatly top and bottom.
10th.–Put in the holes, two near each other at the top of the right side, and two near each other at the bottom of the left side–the rest at equal distances.
Proceed now to the boning, which do by scraping them to fit nicely; then, having covered them with a piece of glazed calico, cut at the bottom of each bone-place a hole, like a buttonhole, and work it round like one. Put the bones in, and drill a hole through the stays and the bone, about an inch and a half from the top and bottom of each bone, and fasten them in with silk, by bringing the needle through the hole to the right side, and passing it over the top of the bone, as marked at figure 12. Then put in the busk, and if a hook is required at the bottom, put that in before the busk, which is best done by leaving a short hole in the seam, and passing the hook through, fastening it securely at the back. The busk must be stitched in very firmly top and bottom.
Should the stays have become soiled in the process of making, they are easily cleaned with bread inside and out, and when cleaned, must be nicely pressed, taking care to make no creases anywhere.
If these simple directions be strictly adhered to in the making up, a pair of well-fitting stays, at a trifling cost, will reward the pains of the worker, and which could not be obtained ready made under five dollars.
*Explanations of Terms
Coutille : French jean of zigzag pattern ‘for corsets.
Coutil : Very strong, stout cotton or linen fabric, woven in herringbone twill; used for corsets.