
What a variety of candles can be found today! The types of waxes have extended beyond the tallow and beeswax of our early ancestors to include paraffin, soy, and gel. There is even another type of wax which was discovered by the American colonists and still in use today. It is called Bayberry wax, which is derived from bayberries, naturally!
Many people are interested in making their own candles. You can find many kits available in the stores today helping you in this regard. Simply melt, add color and/or scent, pour into a mold and presto you have a homemade candle. Well for some of us this just isn’t enough. Being the purist that I am, I enjoy knowing exactly how people from the days of old made the candles they used. So step back with me and lets see how beeswax candles were made on a small scale in the 1870’s.
THE BASIC PROCESS IN A NUTSHELL
Here is a quick overview of the process used in the 1870’s, for those who like to jump right into things. The beeswax, once separated from the honey, is placed in a boiler and gently heated. This part needs caution for those not having dealt with beeswax before. Beeswax doesn’t boil so if over heated, it can ignite. You should be able to bring the wax just past the melting point and stir it often, and that should to do the trick. Then after it has melted it is poured into a linen bag which had been moistened by hot water and then submitted to pressure. The wax would pass through the linen and then be received by a pot which would have been moistened on the inside so as to not have the wax stick to it. It is then remelted in a pot or kettle which was half full of water and then cast into cakes of about an ounce or ounce and half in weight. You would then end up with a clear yellowish colored cake of beeswax.
WHITE OR YELLOW?
When looking around to purchase natural, unscented and uncolored, beeswax candles, most come in a yellow coloring which occurs rather naturally. White is perhaps a little more sparse, which can be for a good reason. Candle making from beeswax is already time-consuming. You must bleach the beeswax to obtain that white color. But bleaching it naturally is that much more time consuming. Lets see what this bleaching process entailed for Victorians to obtain white beeswax.
In 1871 this statement was given in the publication, Manufacturer and Builder, concerning the practice of bleaching beeswax in Italy, “The yellow wax is first melted in a kettle, and then is dipped out into a long tin vessel that will hold two or three gallons, and which has a row of small holes, about the diameter of a knitting-needle, in the bottom. This vessel is fixed over a cylinder of wood two feet in length and fifteen inches in diameter, which is made to revolve like a grindstone, in one end of a trough of water, two and one half feet in width, ten to fifteen feet in length, and one foot in depth. As the melted wax falls in small streams on this wet revolving cylinder, it flattens out into a thin ribbon and floats off toward the other end of the trough of water. It is then dipped out with a skimmer, (that may be made of osier twigs,) spread on a table with a top made of small willow rods, covered with a clean white cloth, and then exposed in this way to the sun until bleached.”
Then in 1874 of the same publication it was said to use this method to simplify the bleaching process, “a small board, smooth and thin, with a handle at one end, is moistened, rapidly dipped into the melted wax, and then into cold water, when the adhering film of wax peels off easily. In this way the wax may be soon reduced to a number of very thin sheets, which are bleached in the open air.”
However, even all these tedious methods were not a guarantee to a white wax. It was noted in 1872 that beeswax wasn’t always successful with the current bleaching process. So a small portion would have been used to test to see if the whole batch of beeswax would take to the sun bleaching with success. If proved successful then the process could take anywhere from 3 to 5 weeks, and only during clear and dry weather, to produce that white beeswax.
Many experiments using chemicals to try and speed up the bleaching process were conducted. Chemicals such as chlorine gas, hypochloric acid, nitric acid, and sulphuric acid were among a few. But the best process was still considered to be the power of the sun. And that was considered the best and most widely used process for the 1870s.
THE RIGHT TOOLS FOR THE JOB
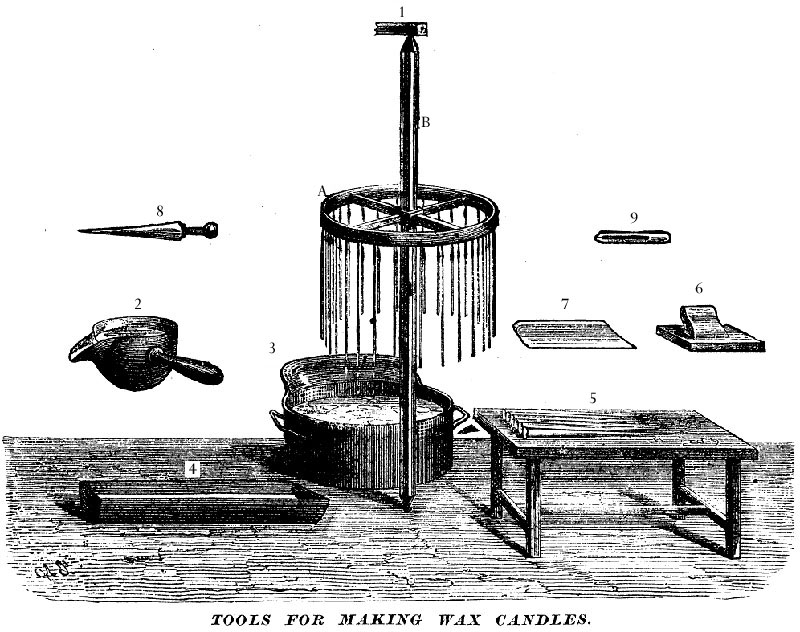
The article of 1874 suggested the above tools for candle making. Figure A shows what is called the hoop and it is supported by the axis, Figure B – which turns on pivots at the top and then kept in place by Figure 1. Other articles would include a kettle [figure 3], a scoop like spoon [figure 2], a small tank [figure 4], a table [figure 5], a polisher [figure 6], a knife of sorts [figure 7], a punch, called a pole, [figure 8], and a pair of wooden forceps if making religions candles [figure 9].
DIPPING AND FORMING THE CANDLES
Outlined below are the steps they used after they had prepared the beeswax.
- Step 1 – Melt your wax in the kettle.
- Step 2 – Hang the cotton wicks on the hoop.
- Step 3 – Use the spoon and while having one of the wicks hung over the kettle pour the melted wax slowly over the wick. Repeat by rotating the hoop to hover each wick over the kettle to be have the wax poured over it. Don’t worry if they end up bigger at the bottom than the top, this is normal. Tip: Make sure the wax isn’t too hot or it will melt the other layers of wax, thus slowing down the whole process.
- Step 4 – When the candles are cold, they are placed in the tank with warm water that is just warm enough to soften the wax, but not too hot.
- Step 5 – When softened they are rolled to an even shape and then polished with the tool shown in the illustration.
- Step 6 – The ends are cut off for a flat edge.
- Step 7 – Use the pole to put a hole at the bottom of the candle in order to be placed in the candlesticks.
RELIGIOUS CANDLES
Interestingly, the article in Manufacturer and Builder, went on to speak about candles that were used in connection with religious customs. It says, “If the candles are to be used for religious purposes, as is customary in the Roman Catholic churches, and lately introduced in this country by the so-called High Church Episcopalians, they must then be ornamented, This is done by a kind of forceps, Fig. 9, made of hard wood, by which the sides of the wax candle are squeezed into leaf-like forms, sometimes made to run spirally around the candle; colored,gilt, and silvered paper is added, sometimes part of the wax painted in different colors, according to taste, etc.
The use of candles during daylight in Christian churches is quite old, and is therefore by many considered orthodox. It was however borrowed from the pagans, who burned lights before their idols. It was only in the eighth century that wax candles were imported into Europe by the Venetians, who obtained them in their trade with the Eastern countries of the Mediterranean.”
REFLECTION
This article discussed only one method that was used to make candles in the Victorian era. I am sure there were many others ways, along with different techniques or tools. However, it’s certainly a far cry from making beeswax candles with this popular method , which just uses a sheet of beeswax and rolls it over the wick. Certainly there is a contrast between the days of old and today. The Victorians had to put a lot of work into making their beeswax candles which were not used as novelties, but were necessary for everyday living. But the fact is we still have bees, and we still have beeswax, which means we still have beeswax candles. Some things just never change.